
 |
 |
 |
 |
 |
 |
 |
 |
 |
11.1 fsc2_guify
Please note: The following will only work if you have Perl and Perl/Tk (in a not too ancient versions) installed on your machine...
There is often a small set of standard experiments, each with a few
parameters that need to be changed all of the time. For example in a
cw-EPR experiment the start and end field and the sweep speed typically
are such parameters. After some time it can become rather tedious having
to edit the corresponding EDL script every time you need to
change these parameters. Besides, for someone not familiar with
fsc2's syntax and who just wants to do a simple experiment it may
appear to be too daunting a task to safely apply the necessary changes
to an existing EDL script.
Fortunately, once you have written an EDL script it is rather
simple to create a Perl script from the EDL script that
allows to set the relevant parameters using a graphical user interface
and which then automatically creates the modified EDL script and
sends it to fsc2 for execution. That's what the fsc2_guify
conversion tool that comes with fsc2 is good for.
Let's go back to the relatively simple EDL script for a cw EPR
experiment from the start of the chapter about the EDL language:
DEVICES:
  er035m_s;              // gaussmeter module
  aeg_x_band;            // magnet module
  sr530;                 // lock-in amplifier module

VARIABLES:
  start_field = 3360.0 G;
  end_field   = 3450.0 G;
  field_step  =    0.5 G;

  field = start_field;
  I = 1;
  data;

PREPARATIONS:
  magnet_setup( start_field, field_step );
  init_1d( );

EXPERIMENT:
  WHILE field <= end_field
  {
      data = lockin_get_data( );
      display( I, data );
      save( data );
      I = I + 1;
      field = sweep_up( );
      wait( lockin_time_constant( ) );
  }
|
Obviously, there are just three variables that often will have to be
changed, start_field, end_field and field_step.
Now, to make the fsc2_guify tool aware of this we need to add
three lines to define variables and change three lines to replace the
hard-coded values by these variables:
DEVICES:
  er035m_s;              // gaussmeter module
  aeg_x_band;            // magnet module
  sr530;                 // lock-in amplifier module

VARIABLES:
=== START_FIELD float [ 2000 : 5000 ] [ 3360 ] "Start field:" "G"
  start_field = START_FIELD G;
=== END_FIELD float [ 2000 : 5000 ] [ 3450 ] "End field:" "G"
  end_field   = END_FIELD G;
=== FIELD_STEP float [ 0.002 : 100 ] [ 0.5 ] "Field step:" "G"
  field_step  = FIELD_STEP G;

  field = start_field;
  I = 1;
  data;

PREPARATIONS:
  magnet_setup( start_field, field_step );
  init_1d( );

EXPERIMENT:
  WHILE field <= end_field
  {
      data = lockin_get_data( );
      display( I, data );
      save( data );
      I = I + 1;
      field = sweep_up( );
      wait( lockin_time_constant( ) );
  }
|
Before explaining the exact meaning of the extra lines let's see what
the conversion tool will make from this. To invoke the conversion tool
on the "enhanced" EDL script (which for now is assumed to be
named `simple_cw.EDL') just type
fsc2_guify simple_cw.EDL simple_cw
This should create an executable script called `simple_cw'.
If you now execute this script the following graphical user interface will show up:
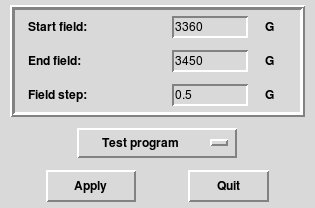
As you see there are three fields for editing the parameters according
to the three lines we added to the EDL script. On the left
side at the bottom there's another button labeled Apply. This
button is usable only when the values you enter into the three fields
are reasonable, i.e. they are numbers and are in the correct range
(see below for how the allowed ranges get set). If you let the mouse
hover over the field where you can edit a parameter the allowed range
for the parameter will be shown.
If, after adjusting the parameters, you click onto the Apply
button the script will automatically generate the EDL
script. Then it will, all by itself, start fsc2 (if it isn't
already running) and send it the EDL script. If
fsc2 will now immediately start the experiment, just test the
script or only load it depends on what you selected with the popup-menu
button just above the Apply and Quit button (which in this
example is set to Test program, so fsc2 will load and
test the EDL script but not yet try to start the experiment).
Now that you have seen what you will get let's have a closer look at the
first of the new lines in the "enhanced" EDL script:
=== START_FIELD float [ 2000 : 5000 ] [ 3360 ] "Start field:" "G" |
All the special lines needed by the fsc2_guify conversion tool start
with three equal signs, at least one space character and followed by a
list of items, separated by spaces. The first item on such a line is the
name of a variable, which may consist of all normal characters, digits
and the underscore character. But you must make sure that its name does
not coincide with one of the name of a variable already used in the
EDL script. The next required item is the type of the
variable, which can be either int, int_empty,
float, float_empty, string, string_empty,
menu, button or file (all in lower case characters).
For variables of type int and float (and
int_empty and float_empty) all the following
items are optional. The first thing you can tell the conversion program
is an allowed range for the value of a variable. Ranges have to be given
in square braces and the start and end value of the range must be
separated by a colon. Thus [ 2000 : 5000 ] tells the
conversion program to let the resulting script accept only values
between 2000 and 5000 for the variable START_FIELD entered by the
user. You don't have to give both a start and end value, if e.g. the
end value is missing the conversion program will only make sure that the
value of START_FIELD is always at least 2000 but won't care about
the end value (but you will need the colon, :, to make clear if
you mean the lower or upper limit).
The next item, a single number in square braces, is the default value for the variable, i.e. the value to be shown when the script is invoked for the first time. The second from last item is a string with the text to be shown to the left of the field for editing the start field. And, finally, the last item is a string with e.g. a unit to be shown on the right hand side of the editable field.
Please note: when the user exits the created script the current values will be stored in a file with the same name as the script in a (if necessary newly created) subdirectory in her home directory, named `.fsc2'. On the next invocation the script will read in the stored values but will use the default values for values that didn't made sense (e.g. because they didn't fit into the range).
Of course, beside this extra line we also must tell the script in which
places the user supplied value has to be used. In this example it's only
one location, just below the special line, where the original value of
3360.0 G has been replaced with the name of the variable
START_FIELD.
The only difference between a float and an int variable
is that, obviously, for int variables you may only use integer
numbers for the range values and the initial value and the user can also
only enter integer numbers.
The difference between int and int_empty on the one hand
and float and float_empty on the other is just that you
won't be able to start the experiment if no number is given for
entries of type int and float while for int_empty
and float_empty you can leave the input field empty. You can
check for that in the template for the EDL script by checking
if the corresponding variable is defined (if it is it will
contain a valid value) and branch accordingly.
Another type of variable is string and tring_empty.
They also can be followed by a range, indicating the minimum and
maximum number of characters that will be accepted (for
string_empty it is also acceptable if the input field
is empty, even though a non-zero minumum is specified in the
range field). This is followed, again in square brackets, by
a default string (to be given in double quotes) and then the
usual sting for the lable of the input field. Thus a line for
a string will typically look like this:
=== TABLE_NAME string_empty [ 1 : 7 ] [ "UCOR1" ] "Table name" |
This allows the user to either leave the input field empty or to enter
a string with between 1 and 7 characters. Note that the variable (in
this case TABLE_NAME) will be replaced in the followeing by
whatever the user inputs into the input field, enclosed in double
quotes.
But there's another type of variables, menu. These are for
cases where you want to have one value selected from a list of
values. To demonstrate this let's improve the EDL script a
bit. For examples sake we assume that you have to switch between
different lock-in amplifiers quite often because some colleague of yours
tends to borrow your favorite one. In this case it would be rather
useful to be able to also select the type of the lock-in amplifier from
within the script. Therefore, we need to replace the line where the
lock-in amplifier is specified in the DEVICES section
sr530; // lock-in amplifier module |
by a lines defining a menu variable like this:
=== LOCKIN menu [ "SR510", "SR530", "SR810" ] [ 2 ] "Lock-in amplifier:" LOCKIN; // lock-in amplifier module |
In contrast to the int and float variables, where the type
of the variable was followed by an (optional) range, for menu
variables a list of strings with the menu entries is required. This list
must be enclosed in square braces and the strings with the entries
separated by commas. (If you need a double quote character within one of
the strings you must escape it with a backslash.) After the list of the
menu entries an optional field (again in square braces) can be given
that specifies the default entry to be shown, in our case it is the
second, i.e. the menu entry with "SR530". Again, as already in
the case for float and int variables you can specify the
strings to be shown to the left and right of the popup-menu.
If we now again convert our improved and enhanced EDL script
and start the resulting script, we will get the following graphical
interface:
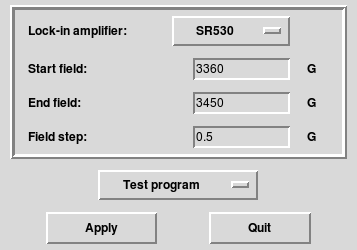
The new popup-menu will allow you to pick the model of the lock-in amplifier to be used in the experiment.
Another graphical element that can be used are simple check-buttons,
i.e. buttons that can have two states, either activated or inactive.
With such a buttom a variable gets associated that has the numerical
value 1 if the button is activated and 0 if it's in the
inactive state. You create such a button with a line like
=== MY_BUTTON button [ ON ] "Text describing what the button does" |
in the "enhanced EDL script.
As usual, the first entry on that line after the three equal signs is
the name of the variable associated with the button and the next entry
denotes the type of the object, i.e. a button. Then follows an
optional default value for the state of the button in square
braces. Here you can either use ON or 1 to have the button
activated by default or OFF or 0 to have is switched
off. When the default value is not specified the button is switched off
by default. Finally, one or two optional strings follow, the first one
specifying the text to apear to the left of the button and the second at
the right of it.
Finally, there are file variables. These are for cases where you
want to put a file name into an EDL script. The syntax is even
easier, you just need a line like this:
=== FILENAME file "Data file:" File = open_file( FILENAME ); |
to get an additional field in the graphical interface for entering a file name. The only (optional) item you can put on such a line is the string to be shown on the left hand side from the field. On the right hand side of the field a button automatically appears that lets you start a file selector.
But that's not all you can do. Sometimes it's necessary to change the
EDL code depending on what the user selected. For an useful
example let's further improve the EDL script to include
setting the lock-in's time constant. To do so, you normally would
include a line for defining the time constant in the VARIABLES
section and a line, somewhere at the start of the EXPERIMENT
section to set the lock-in's time constant. The "enhanced" EDL
script now would look like this:
DEVICES:
  er035m_s;              // gaussmeter module
  aeg_x_band;            // magnet module
=== LOCKIN menu [ "SR510", "SR530", "SR810" ] [ 2 ] "Lock-in amplifier:"
  LOCKIN;                    // lock-in amplifier module

VARIABLES:
=== START_FIELD float [ 2000 : 5000 ] [ 3360 ] "Start field:" "G"
  start_field = START_FIELD G;
=== END_FIELD float [ 2000 : 5000 ] [ 3450 ] "End field:" "G"
  end_field   = END_FIELD G;
=== FIELD_STEP float [ 0.002 : 100 ] [ 0.5 ] "Field step:" "G"
  field_step  = FIELD_STEP G;

  tc          =   300 ms;

  field = start_field;
  I = 1;
  data;

PREPARATIONS:
  magnet_setup( start_field, field_step );
  init_1d( );

EXPERIMENT:

=== FILENAME file "Data file:"
  File = open_file( FILENAME );

  lockin_time_constant( tc );

  WHILE field <= end_field
  {
      data = lockin_get_data( );
      display( I, data );
      save( data );
      I = I + 1;
      field = sweep_up( );
      wait( tc );
  }
|
In this script also a new variable was introduces for the length of time to wait in the loop for the experiment. This is is more effective because we now don't have to query the lock-in amplifier each time.
Now let's make this new time constant variable adjustable by the user. And to further improve things we also would like to make it possible not to set a time constant but to simply use the one which is already set at the lock-in's front panel. To do so we could create a menu (a menu is appropriate here, because the lock-in amplifier only allows discreet settings for the time constant):
=== TC menu [ "Don't set", 3 s", " 1 s", "300 ms", "100 ms", \ === " 30 ms", " 10 ms", " 3 ms" ] [ 4 ] "Time constant" |
There is something new here: Because it would look rather ugly to have an extremely long line for specifying all the different time constant settings the lock-in allows on a single line, we put a backslash at the end of the first line, thus indicating to the conversion script that the next line is a continuation of the current line (but then we also have to start the new line with three equal signs (and a space) or it wouldn't know what to do with it).
But the more important point is how to deal with the first menu entry, where we promise that the script won't set the time constant but instead will use the one already set at the lock-in. The first occurrence is at the line
tc = 300 ms; |
If we just added the above line and the user selects the "Don't
set menu entry we would get a line like
tc = Don't set; |
and we can be quite sure that fsc2 would complain loudly
about a syntax error. Thus we'll need to make this line depend on
which menu entry the user selected. To do so we'll have to use
(including the commands for creating the menu):
=== TC menu [ "Don't set", " 3 s", " 1 s", "300 ms", "100 ms", \ === " 30 ms", " 10 ms", " 3 ms" ] [ 4 ] "Time constant" === if TC eq "Don't set" tc; === else tc = TC; === endif |
So, beside defining and using special variables you may also use if-else
constructs. The condition here is if the selected menu entry, TC,
is set to Don't set or to something else. In the first case, we
would just declare the new EDL variable tc, but in the
second case we also have to initialize it to the user selected
value. Thus we use the condition TC eq "Don't set" to find
out what to do. The meaning is hopefully rather obvious: eq
stands for equality (of two strings). If TC is set to the menu
entry "Don't set" the strings will match and the first
alternative, i.e. just declaring but not setting tc, will be
chosen. Otherwise the other branch of the if-else-construct will be used
and tc will be initialized with the value the user selected.
(If you are real careful, you will have noted some difference between
the behavior of the variable TC in the line starting with the
three equal signs, where it still to be treated as a string, and the
place where it appears in the "enhanced" EDL code and where
its content is simply pasted in, without any double quotes. If you
really should need an EDL string you would have to include the
double quotes when declaring the menu entries, e.g. by using
"\"Don't set\"", but then also make sure you use this form
also in the three-equal-signs part, or, alternatively, put the variable
in the EDL part in double quotes. In contrast to menu
variables, file variables are always treated as strings.)
Instead of the comparison for equality, eq, we could also have
used the opposite operator, ne, which evaluates to true if the
strings differ.
Of course, there is a second place where we have to apply a change.
That's in the line where we really set the lock-in's time constant at
the start of the EXPERIMENT section. Here we have to replace
lockin_time_constant( tc ); |
by
=== if TC ne "Don't set" lockin_time_constant( tc ); === else tc = lockin_time_constant( ); === endif |
i.e. if the user selected a time constant we have to set the lock-in amplifier accordingly, otherwise we just query the time constant but do not change it.
If you aren't satisfied with just if, else and endif
you may also try your luck with elsif, which stands for "else if".
This means you can also use constructs like
=== if TC eq "Don't set" tc = lockin_time_constant( ); === elsif TC eq " 3s" print( "Few, that's going to be a real long experiment...\n" ); lockin_time_constant( tc ); === else lockin_time_constant( tc ); === endif |
in which case the script would output a sentence grumbling about the
time the experiment will take when the user selected a time constant of
three seconds. Please note that it's important not to omit any spaces
from the string when comparing it against a menu entry - for human eyes
it's obvious that " 3s" and "3s" is supposed to mean
the same, but computers aren't that good at getting the meaning but just
care about formalities...
Of course, you can also compare numbers in if-elsif-else-endif
constructs (or whatever you care to call them). The reason that we were
talking about the eq and ne operator only until now is
because menu variables are strings, so they got to be compared as
strings. On the other hand, the start and end field as well as the field
step to be used are all (floating point) numbers, so if you need to
compare them you will have to use the proper operators. These are:
== for equality, != for inequality, and, finally,
<, <=, > and >= to check for less then, less
or equal then, larger then and larger or equal then.
One example where this would come handy is to check if the start field
is lower than the end field (otherwise the above script wouldn't do
anything useful) and, if necessary, to reverse them. To make sure the
lower field value is always the start field you could write in the
VARIABLES section
=== if START_FIELD < END_FIELD start_field = START_FIELD G; end_field = END_FIELD G; === else start_field = END_FIELD G; end_field = START_FIELD G; === endif |
Of course, this still leaves a possible hole in our EDL
script in case the start and end field the user entered are equal.
So we could improve the code by checking also for this case and force
the end field to be at least one field step larger than the start field:
=== if START_FIELD < END_FIELD start_field = START_FIELD G; end_field = END_FIELD G; === elsif START_FIELD == END_FIELD start_field = START_FIELD G; end_field = END_FIELD G + FIELD_STEP G; === else start_field = END_FIELD G; end_field = START_FIELD G; === endif |
One thing you might take from this (admittedly somewhat contrived)
example is that you can use the field step variable FIELD_STEP
even before it appears in the code. The place where a variable for the
conversion tool gets declared is completely irrelevant, you also could
move all of them to the very end of the "enhanced" EDL
script. The only thing of importance is the sequence in which they are
declared, because this determines the sequence they are shown in the
graphical user interface.
Actually, you can even do a lot more after the if or elsif,
you may e.g. use arithmetics within the condition. The secret behind this
is that the things following if or elsif are evaluated via a
call of the Perl eval() function after a $ has been prepended
to the variables (to make them proper variables of the script generating the
EDL script). I.e. a comparison like START_FIELD <
END_FIELD is evaluated by the Perl machinery as
eval{ $START_FIELD < $END_FIELD }
|
Thus, after if or elsif you have the whole power of Perl
at your finger tips, including all of its regular expression evaluation
machinery. If you know Perl you'll be able to do really weird things
with this, you can even have complete little Perl scripts (as long as
they return a value that can be interpreted as true or false) into the
conditions ;-) Just be careful not to change the variables from
within the condition (unless that's exactly what you want to do).
|
|
|
|
|
This document was generated by Jens Thoms Toerring on September 6, 2017 using texi2html 1.82.